


Knee Immbolizer 19″ { Long Type }
|
||||||||||
| Steps for Proper Application | ||||||||||
| 1. Preparation | ||||||||||
| Choose the correct size knee immobilizer based on the patient’s leg length and circumference. | ||||||||||
| Ensure the brace is clean and free from damage or wear. | ||||||||||
| 2. Position the Leg | ||||||||||
| Place the patient’s leg in a fully extended position on a flat surface. | ||||||||||
| Ensure the knee is straight and relaxed. | ||||||||||
| 3. Align the Immobilizer | ||||||||||
| Open the immobilizer and lay it flat beneath the leg. | ||||||||||
| Align the center of the brace with the knee joint (the patella or kneecap should align with the central opening, if present). | ||||||||||
| Ensure the brace covers from the upper thigh to just above the ankle for optimal support. | ||||||||||
| 4. Wrap and Secure the Straps | ||||||||||
| Start from the bottom (ankle area) and work upward toward the thigh. | ||||||||||
| Wrap each strap snugly around the leg, ensuring even pressure but avoiding excessive tightness that may restrict circulation. | ||||||||||
| Fasten Velcro straps or buckles securely to keep the brace in place. | ||||||||||
| 5. Check for Proper Fit | ||||||||||
| Ensure the brace is snug and does not slip during movement. | ||||||||||
| Verify that there is no excessive pressure on bony prominences (e.g., kneecap, shin, or thigh). | ||||||||||
| Ensure the patient can wiggle their toes to confirm proper blood flow. | ||||||||||
| 6. Reassess After Movement | ||||||||||
| Ask the patient to perform slight movements (e.g., sitting or adjusting posture) to ensure the immobilizer stays in position. | ||||||||||
| Adjust straps as needed for comfort and stability. | ||||||||||
| Tips for Use | ||||||||||
| Wearing Duration: Follow the healthcare provider’s instructions regarding how long to wear the immobilizer. | ||||||||||
| Skin Care: Check the skin under the brace regularly for signs of irritation, redness, or sores. | ||||||||||
| Hygiene: Keep the immobilizer clean by wiping it down or following the manufacturer’s cleaning instructions. | ||||||||||
| Avoid Moisture: Ensure the brace and the leg are dry before application to prevent skin irritation. | ||||||||||
| When to Remove | ||||||||||
| Remove the immobilizer only as directed by a healthcare professional, typically for hygiene, physical therapy, or as part of a treatment plan. | ||||||||||
| Avoid unnecessary removal, as it can delay recovery. | ||||||||||
| Common Uses | ||||||||||
| Post-surgical recovery (e.g., ligament repair, meniscus surgery). | ||||||||||
| Severe knee sprains or strains. | ||||||||||
| Patellar dislocations. | ||||||||||
| Fractures around the knee. | ||||||||||
| Knee instability due to ligament injuries. | ||||||||||
| Proper application and maintenance of a knee immobilizer can promote effective healing and prevent complications. Let me know if you need additional guidance! | ||||||||||
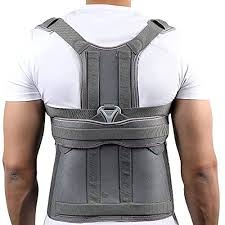
Taylore Brace { Long / Short Type }
Postural Support – Helps correct poor posture and provides spinal alignment.
Mild to Moderate Kyphosis – Supports the upper back to prevent excessive forward curvature.
Thoracic & Lumbar Spine Injuries – Supports healing after fractures or soft tissue injuries.
Post-Surgical Spinal Immobilization – Helps stabilize the spine after surgery.
Compression Fractures – Reduces pain and movement for better recovery.
Chronic Back Pain – Provides relief by reducing strain on muscles and ligaments.